Kosong.. kosong.. oh oh!! (Bak kata Najwa Latif).
Beli kasut satin hijau ni kat JPO, kosong sangat la pulak. So tangan ni mulalah menggatal nak deko deko..
Buat malam raya hari tu, tetibe jek sekelip mata dah ada kasut raya baru. Huhu.. It only took me half an hour to make this pair of ribbon - free handed cutting, a little bit of glue here and there, no sew design and as a result:
Black felt ribbon that matches the lining, plus a short lace and a big green bead for each shoe.
Selamat hari raya!!
Showing posts with label DIY. Show all posts
Tuesday, August 28, 2012
Thursday, August 16, 2012
Set Tilam for Adik Balqis
Sayang pulak nak buang kain lebih, ada excess sikit, cik abby buat U-neck support pillow untuk Cikbal. Almaklumlah, raya nanti nak jalan jauh, dalam kete die buleh pakai tido. Huhu..
Anyway, selamat hari raya Aidilfitri untuk semua!
Sunday, December 11, 2011
DIY: Shelf Back Cover
Have you ever encountered with a blank yet boring bookshelf? Now it is about time to add some blast to it. This time I did the shelf back cover (notice the stripe cover at the back of the shelf!) of the bookcase.
Looked awesome? Get the tutorial here. It's a super easy DIY!
Make this:
From this:
Looked awesome? Get the tutorial here. It's a super easy DIY!
Monday, November 7, 2011
A Case for your Stationery
This is it. This is the pencil case I'm talking about. A dimensions of 20 x 12 cm, big enough to store more than 10 pens, 2 highlighters, an eraser, a marker and a stapler.
As usual, geometry motives for my husband, I chose circles to represents the earth (I know, I know earth is sphere), and I did it in a colorful way, hence the fancy look. A green background is dedicated to our source of oxygen, the refreshing trees and forests.
I think it is really worth it to stitch those 20 colorful circles (what a relieve!), because it ended up very nice, indeed (puji diri sendiri). Hehe..
Well, sharing is caring!
Labels:
crafty-licious,
DIY,
eco-Chic,
fabrics,
felt,
hobbies,
mother Earth
Thursday, November 3, 2011
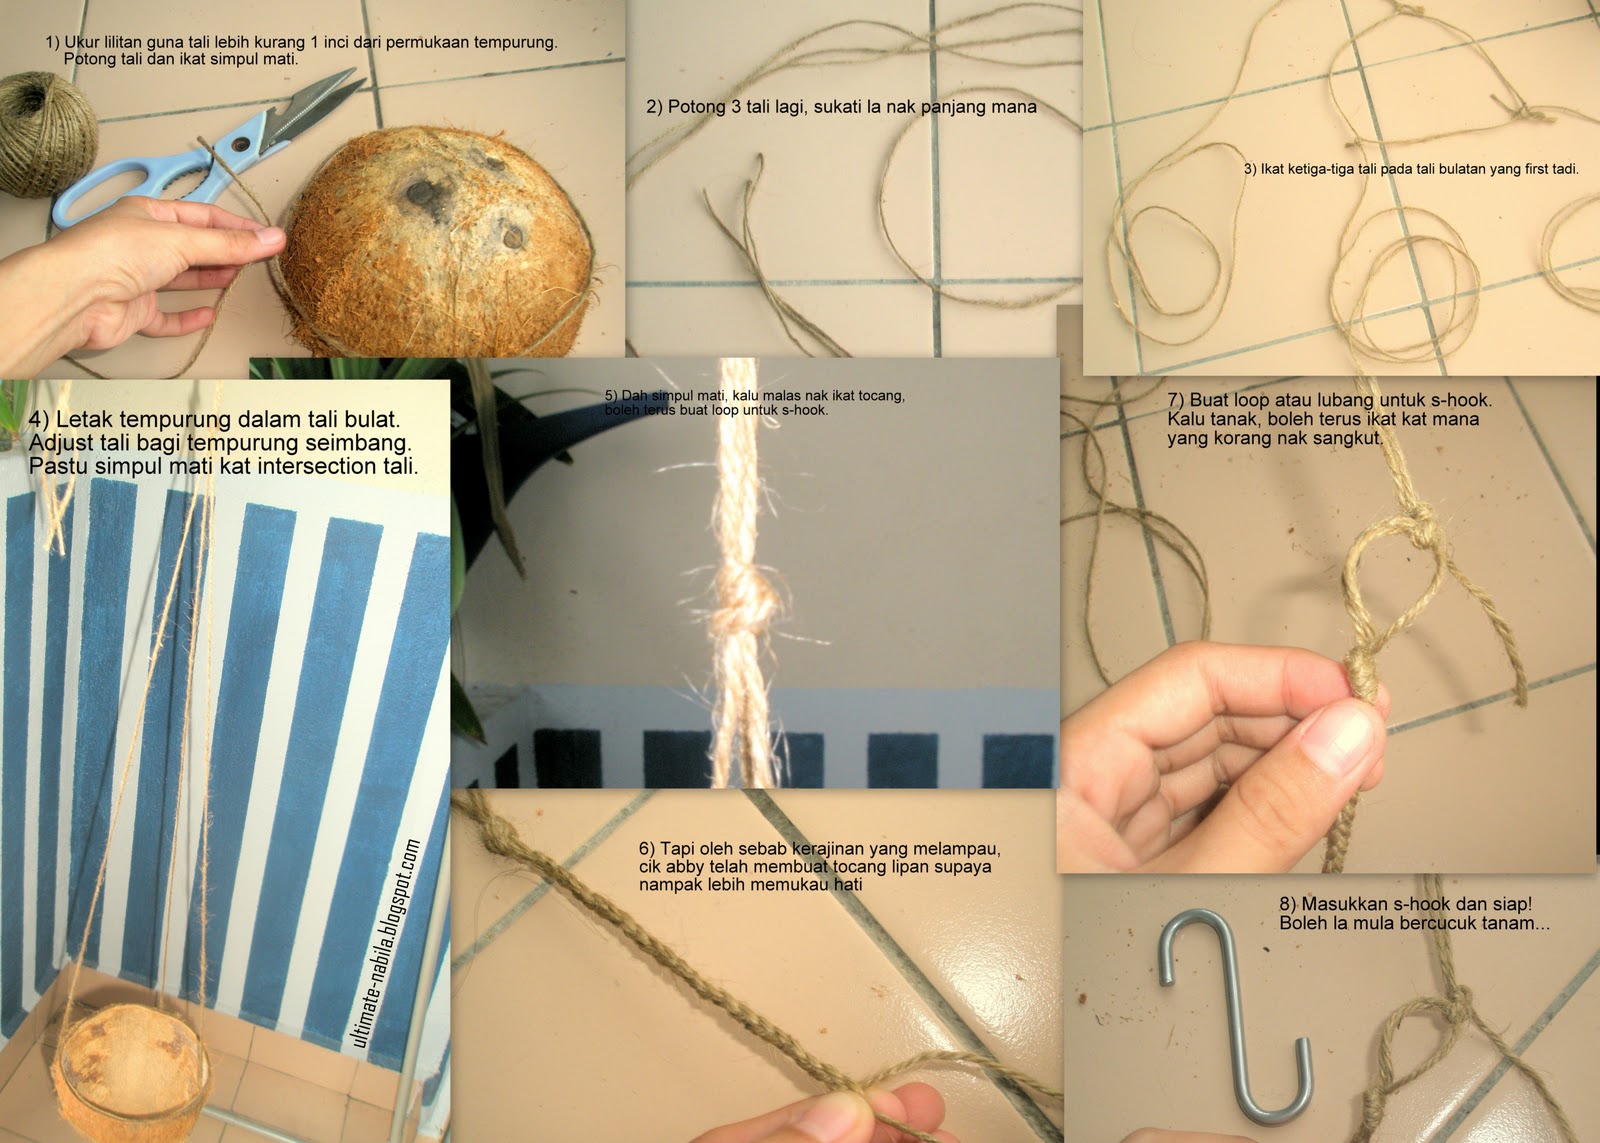
Recycle: Coconut Shell as Hanging Plant Pot
Kepada sesape yang terlebih rajin, yang nak buat garden ala-ala di tepi rimba, boleh la try buat.
Materials yang digunakan adalah seperti berikut:
S-hook tu beli kat Ikea, brand Bygel RM 1.60/10pcs. Murah je. Hemp twine tu lebih kurang macam tali jut la, beli kat Daiso @Curve, RM 5.00/3pcs. Daiso tu sume barang RM5, ada kat IOI Mall, Curve, One Utama, Aeon Bukit Indah JB. Tempurung kelapa tu pulak buat muka tempe mintak kat brader jual santan kat pasar. Die lagi suka sebab kurang sikit tempurung die kene buang. Hehehe.. Gunting potong ikan tu cik abby amik kat dapur.
Jom start!! Kalu tulisan kecik sangat, click image to enlarge.
Kalu hati nak, senang jek. Kejap dah jadi. Amatlah sesuai untuk pepohonan yang berjuntai-juntai dan air plant (pokok udara). Lagi mengancam bile pokok dah mula berjuntai ke bawah.
Kalu nak buat, tempurung kelapa tu bersihkan dulu guna sabun untuk hilangkan bau kelapa, allow to dry for 1-2 days. Nanti residue kelapa dalam tempurung tu tanggal dengan sendirinya.
Nah, amik ni pantun 2 kerat:
Buat pasu guna tempurung kelapa,
Selamat mencuba!!
Labels:
crafty-licious,
DIY,
gardening,
hobbies
Wednesday, November 2, 2011
A Handphone Case Made with Love
My husband was my first customer. He wanted a case for his new phone. He designed the case himself and chose his own color. Light chocolate as the background, blue, red and grey as the geometry motives.
I decided to use felt paper. I did some serious patching. Mata dah naik juling, nak muntah pun ada gak. Hehe.. But for the sake of love (poyo), I've done it!!
Check this out:
Doesn't it looked gorgeous? I put the stripe cotton fabric as the inner layer to cover the messy patching thread. Patching those red-blue-grey pieces just drove me crazy. It is fortunate that I was blessed with patience and skills. Huhu..
I'm glad my hubby likes it. I mean, a lot!! And it just made me even happier to see him slide the handphone in and out from the case, several times. I can see he was as excited as I am.
My iPod case is next.
Thanks for reading.. Sharing is caring, indeed!
I decided to use felt paper. I did some serious patching. Mata dah naik juling, nak muntah pun ada gak. Hehe.. But for the sake of love (poyo), I've done it!!
Check this out:
Doesn't it looked gorgeous? I put the stripe cotton fabric as the inner layer to cover the messy patching thread. Patching those red-blue-grey pieces just drove me crazy. It is fortunate that I was blessed with patience and skills. Huhu..
I'm glad my hubby likes it. I mean, a lot!! And it just made me even happier to see him slide the handphone in and out from the case, several times. I can see he was as excited as I am.
My iPod case is next.
Thanks for reading.. Sharing is caring, indeed!
Labels:
accessories,
crafty-licious,
DIY,
fabrics,
felt
Tuesday, November 1, 2011
My Very Own Sling Bag
It was my first attempt. Two nights of light sleep and I nailed it! (nak buat siang, tapi Balqis kacau. Hehe)
Ok lah kan for first attempt. Lain kali buat maybe boleh lagi cantek kot. Huhu.. I still have a lot to learn though..
Labels:
accessories,
DIY,
fabrics,
hobbies
Monday, October 31, 2011
Recycle: Aluminium Candle Container as Picture Holder
When the light is out, candle is the first things that come across your mind, right? (or is it torchlight? hahaha).. Light the candle. When the wax is out, light out, aluminium container empty. Actually, you can do something with this wasted containers, as a picture holder!!
Two slits are all that it takes! Cut both ends of the container (estimate your width of your picture). Don't go too big or your picture will fall..
You can insert two pictures at the same time. In front and at the back.
Alternatively, I also slipped my old-become-new mirror. The broken mirror was from my make-up box and I gave it a new kitten frame, appreciating the love for cats of my little girl.
There you have it.. What a great way to recycle, huh?
Happy trying y'all!! Sharing is caring!
Labels:
crafty-licious,
DIY,
fabrics,
felt,
hobbies
Saturday, October 29, 2011
Got Excess Fabrics?
Orang melayu cakap kain perca. Omputih cakap excess fabrics.
I got some excess after I was done with my notice board and my so-called wall art. I gave my dull cushion a brand new look, but unfortunately I can only managed to sew one. X cukup kain la pulak. Kain perca la katakan. I also made a table runner for my TV bench. I do not have a sewing machine (soon will have) so I stitched along the parameter so that it did not look messy. I used embossed thread to give an impact on the stitching.
Check it out:
Other than that, place mats and wall pocket would be awesome too (already in my soon-to-do list)!!
Got any more ideas? share with me..
Labels:
crafty-licious,
DIY,
fabrics,
hobbies,
wall art
Friday, October 28, 2011
A New Pouch for my DigiCam!
The old pouch is gone. Seems like Balqis has played with it and misplaced somewhere I cannot found. My digital camera was naked for a couple of days. It must been cold for the camera, so I did a new pouch for it.
I used felt paper. Measured the dimensions and cut. I tied double slip knots around the pouch, I did not sew. A big wood button is used and a 4 cm elastic thread as the button hole. You can say that the button is an accessory too. I also made a hole for my camera strand. A neat finish is made by stitching the cover using contrast embossed thread. The best part is I made my mark on the back of the pouch, written 'abby'..
Now my camera is warm enough.
If you are tired with your old camera pouch, why don't you try to make a new one?
Happy trying! Sharing is caring
I used felt paper. Measured the dimensions and cut. I tied double slip knots around the pouch, I did not sew. A big wood button is used and a 4 cm elastic thread as the button hole. You can say that the button is an accessory too. I also made a hole for my camera strand. A neat finish is made by stitching the cover using contrast embossed thread. The best part is I made my mark on the back of the pouch, written 'abby'..
Now my camera is warm enough.
If you are tired with your old camera pouch, why don't you try to make a new one?
Happy trying! Sharing is caring
Thursday, October 27, 2011
An idea for DIY Wall Art
Didn't I mentioned about a wall art in 'Jom Buat Notice Board'?
Let's start!
Do you have a cardboard or recycled box? Don't throw. Go buy an abstract fabric that catch your eyes. Measure the desired dimensions of your wall art, cut the fabrics and box according to the determined measure. Use stapler or strong glue to paste the fabrics onto the box. Hang (I just used double sided-tape to stick them onto the bare wall).
And Wallaaaaa!!!
You can always separate the features into 2,3,4 or just one big great piece of wall art!
Happy trying! Sharing is caring..
Let's start!
Do you have a cardboard or recycled box? Don't throw. Go buy an abstract fabric that catch your eyes. Measure the desired dimensions of your wall art, cut the fabrics and box according to the determined measure. Use stapler or strong glue to paste the fabrics onto the box. Hang (I just used double sided-tape to stick them onto the bare wall).
And Wallaaaaa!!!
You can always separate the features into 2,3,4 or just one big great piece of wall art!
Happy trying! Sharing is caring..
Labels:
crafty-licious,
DIY,
fabrics,
wall art
Convert your Ugly Container into a Fancy One!!
If you are a take-away junkie, then you must have a lot of empty plastic containers. They can be reused over and over, and that is a good thing. But what if you do not use them? So take out your containers hidden deep inside your kitchen cabinet, and make them pretty!!
I got a bunch of excess paints after painted the house last year, so just used them. Alternatively, use water color. Let them dry after the first motives if you want to decorate more than one color. A glossy finish can be created when you spray a thin coat of transparent gloss (ada kat kedai hardware).
There you have a fancy container in less than 30 minutes. Labeling your stuffs on it also can make your container looked smart and cool. Try it!!
Pesanan penaja: Do not ever use the container for food storage as it might be contaminated (from the paint).
Labels:
crafty-licious,
DIY,
hobbies
Location:
Bangi, 43000 Kajang, Selangor, Malaysia
Tuesday, October 25, 2011
Create more space with Shelf!
Once upon a time, I was doing an ultimate cleaning. While cleaning the store, I found a piece of papan pendek, the excess part of my kitchen cabinet. Sayang pulak nak buang. Then the thinking began...
I looked at my chaotic, messy work space and ting *lift eyebrow, cynical smile *, a shelf would be good!
I just used two tins to support the shelf. I put anti-slip mat in between the shelf/tins and tins/desk.
If you have something such as this papan, don't just throw it away. Lain la sampah kan. Keep it, because it might be useful to you someday, someday, someday... (echoing)!!
Happy trying! Sharing is caring y'all!
I looked at my chaotic, messy work space and ting *lift eyebrow, cynical smile *, a shelf would be good!
I just used two tins to support the shelf. I put anti-slip mat in between the shelf/tins and tins/desk.
If you have something such as this papan, don't just throw it away. Lain la sampah kan. Keep it, because it might be useful to you someday, someday, someday... (echoing)!!
Happy trying! Sharing is caring y'all!
Pin Cushion ku yang x seberapa
Jarum-jarum peniti ku kat atas gobok (cakap orang joho) ada, kat atas meja ada, kat dalam beg ada.. mana aku nak letak jarum ni?
Jawapannya, cucuk la kat Pin Cushion. Kat kedai ada jual, tapi kalu buleh buat sendiri, apa hal aku nak kuar duit beli, ye tak? Paling sonang, bak kata orang kampung, "piece of cake", buat bentuk bulat leper.
I went to Sushi King today and bought my daughter a Melon Sherbet. Bekas die looked cute, so cik abby pun bawak la balik umah. Last-last jadik tempat pin cushion. Selalu tempat pin cushion takde petutup, tapi cik abby punye ade sebab bekas comel Melon Sherbet tu siap ada lid. Kurang la sikit bahaya tu kalu anak-anak ter'main' pin cushion.. Tapi jangan la bagi main terus. Bahaya tu tetap ada. Malang tidak berbau Calvin Klein ok!
Well, below are the series of events that I went through to make a simple pin cushion. Check it out y'all!!
Happy trying! Sharing is caring!
Jawapannya, cucuk la kat Pin Cushion. Kat kedai ada jual, tapi kalu buleh buat sendiri, apa hal aku nak kuar duit beli, ye tak? Paling sonang, bak kata orang kampung, "piece of cake", buat bentuk bulat leper.
I went to Sushi King today and bought my daughter a Melon Sherbet. Bekas die looked cute, so cik abby pun bawak la balik umah. Last-last jadik tempat pin cushion. Selalu tempat pin cushion takde petutup, tapi cik abby punye ade sebab bekas comel Melon Sherbet tu siap ada lid. Kurang la sikit bahaya tu kalu anak-anak ter'main' pin cushion.. Tapi jangan la bagi main terus. Bahaya tu tetap ada. Malang tidak berbau Calvin Klein ok!
Well, below are the series of events that I went through to make a simple pin cushion. Check it out y'all!!
Happy trying! Sharing is caring!
Sunday, October 23, 2011
Jom Buat Notice Board!!
Ever wonder what to put on the wall of your work desk?? Can everybody in the house saw the reminder/notes I put on the desk? Well my friends, a reminder is clearly visible if you stick it on the wall, but where? People always stick them on their notice board, arghhhh I don't have one *sobbing*!!
Why don't you make one on your own? Jimat kan?? 4 easy steps and your wall will has a different new look!! Let's make the space usable. Check it out!
This idea came up after staring (for quite a while) at the boxes in my store room. "What can I do with boxes?", mumbling alone. I just bought a new work desk and there is no shelf what-so-ever on the wall so it looked blank, empty. Hmm what about a notice board? I got all the things I needed at home. Thus the work began. Less than 30 minutes, the wall seemed to be very useful and I was excitedly fill the board with pictures and notes.
Why don't you make one on your own? Jimat kan?? 4 easy steps and your wall will has a different new look!! Let's make the space usable. Check it out!
| 1) Prepare all the stuffs you need. |
| 2) Cut the board and the fabric according to your desired dimension (psss.. you might need a pencil & ruler to measure) |
| 3) Stick the fabric onto the board using tape and staple (jangan lupe, tarik tegang2, kalu kendur x cantik) |
![]() |
| 4) Done!! Up to you nak gantung vertically or horizontally. Senang kan.... |
This idea came up after staring (for quite a while) at the boxes in my store room. "What can I do with boxes?", mumbling alone. I just bought a new work desk and there is no shelf what-so-ever on the wall so it looked blank, empty. Hmm what about a notice board? I got all the things I needed at home. Thus the work began. Less than 30 minutes, the wall seemed to be very useful and I was excitedly fill the board with pictures and notes.
Alternatively, it doesn't have to be a notice board alone. Why don't you use an abstract fabric, there, you now have a nice interior for your living room. Isn't it great? How much does a picture cost to be compared to your D.I.Y picture? Lalalala~~
Happy trying!! Sharing is caring.
Labels:
crafty-licious,
DIY,
fabrics,
wall art
Wednesday, October 19, 2011
How to make Carnation using tissue paper
I don't know what to do. So I searched something on YouTube, and I found this. I tried and surprisingly it only took a couple of minutes to finish it. Tak percaya? Check it out!!
Happy trying!! Sharing is caring y'all!!
Balqis is indeed my best buddy!!
You can try using colored tissue papers too, and you won't believe you eyes!! All you need to do is just grab a piece of tissue, and do as I told you!!
Ideal for decoration for your home, wedding, or a bouquet of carnation for someone special??
Happy trying!! Sharing is caring y'all!!
Labels:
crafty-licious,
DIY,
flower,
hobbies,
tissue
Subscribe to:
Posts (Atom)